A letter to a moth

Dear Mr (or Mrs) Moth,

This is the last straw. I wish to make it quite clear that there is now a war between us and you are not welcome in my house. Not that you ever were. You have been having free meals on my handknits for far too long and this week was the end.

After the past couple of years of finding you in the house eating my carpets and hexipuffs, I thought we were finally through. There was also the felted wool dress that you had for lunch. I was not quite so sad about losing that as the dress was not meant to be felted and dolls size but I did have nice plans to make a bag out of it, but what use is a bag full of holes? I had not seen you for a few months so I thought I was safe. How wrong I was.

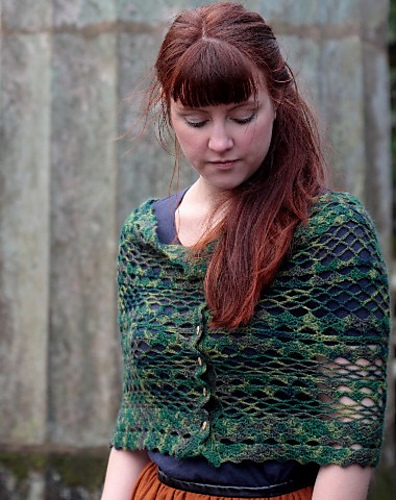
In 2011 I knitted a Swallowtail Shawl for my Nan's birthday. She always wore a shawl around her shoulders to keep her neck warm. It was beautiful and she loved it. In fact, she loved it so much she hardly wore it because she was frightened something might happen to it. She wore it for her 90th birthday party in 2013 and loved it.

Queenie died just over a year later and I still miss my Nan. I kept her special shawl to remind me of the birthday party fun we all shared with her.

So last week when I was sorting through my clothes as part of getting organised I took out the shawl and found you and your children had been munching through it. 

It was obviously very tasty as there are large parts of it now gone and it is far beyond repair. There are other just as lovely and yummy (now don't go getting any ideas) shawls and scarves in that drawer but none that meant as much to me as Queenie's shawl.

I mean, I know it is a lace shawl and maybe you thought you was helping to add some more holes but there are holes that are meant to be there and holes like the one below that really are not.

So this means war. So far I have not found you in my yarn stash or my design samples but let it be known these and all other areas of my house are no go areas for moths. Things are now so serious that I am even letting spiders stay rather than getting them evicted when they show their hairy little bodies with creepy legs. Despite my terrifying fear of spiders I currently prefer them to you and they are welcome to eat you if they find you.

I have prepared all my weapons (moth killers) and my shields are up (essential oils). You will not survive here so give up and leave. Please warn all your children, and your children's children that I am on the warpath and I am not taking prisoners.

Yours sincerely,

Sarah the moth killer

Two colour Crowberry

Eighteen months ago (was it really that long??) I knitted myself a Crowberry cardigan. It is one of my most popular patterns but I did not have a sample of my own. The original sample is owned by Woolyknits who supplied the lovely Bluefaced Leicester DK yarn. I had been wanting one of my own to wear but was having the usual problem of so much to knit and too little time - a perpetual problem for every knitter.

When I finally decided I was going to treat myself to my own version I fell in love with the navy Rowan felted tweed DK. I love navy and the tweedy effect adds an extra bit of prettiness. The navy balls of yarn were sitting in the shop next to the pretty white with blue tweedy bits balls.... and they looked so good together I just knew I had to use them both. The idea for a two coloured Crowberry was born.

The contrasting colour is used to accentuate the Crowberry pattern on the front of the cardigan and also used in the i-cord cast off and button holes. I have to confess I love it and I wear it frequently. 

The PDF pattern for Crowberry has now been updated to include instructions for the two colour version as well as the original one colour. It has also been updated to my new Aldersign layout. Thank you to everyone who has purchased this pattern already, you should get an email letting you know it has been updated. For those of you who would like to buy it and make your own, there is a discount of 25% off the usual price for this week only. The discount will automatically be applied at the till.

A knitterly review

2015 is nearly over and I am sitting with my family ready to watch the fireworks in London, toast a glass of my Dads finest single malt and sing a rather out of tune Auld Lang Syne. It has been a very busy year and looking back through all my photographs, I achieved so much this year, I am almost too exhausted to start thinking about what 2016 might bring!

I set myself a few challenges this year. The first was to produce my first book of knitting patterns. I am really proud of An Elven Reckoning. It has got some great reviews and I loved having a stand at Yarndale where I got to show off all the samples. It was a fantastic weekend and the book is still doing well. I am about to order my second print run! Each of the twelve patterns all came from ideas that have been lurking in my head for several years and all mean something special to me. My favourite photo from our shoot made the front cover of the book. I give my heartfelt thanks to all my friends and family who helped me get it out there.

There were a few other designs released in 2015 as well as those in my book. Horwood is a cute textured hat that is published by the Knitting and Crochet Guild. There was also the Baby Owl Mobile pattern for crochet lovers and cute babies, Cozette Cowl in Knit Now! February issue and May Cowl in the BaaRamEwe book of Titus mini knits.

All that is left is for me to wish you all a happy, healthy and prosperous New Year and to persuade my Dad to open his whisky cabinet ;) Cheers!


Crafty Secret Santa

Each year my local knit/crafting group get together for a christmas meal and gift swap. It is one of the highlights of my year and the gifts are amazing every time. Each person brings a hand crafted gift. Names are put in a hat and whoever's name you pull out, you get their gift. So the secret is you don't know who you are making a gift for! 

We had lots of fun at the meal, wearing the christmas cracker hats was compulsory (for at least ten minutes) and plenty of wine was drunk.

This year I decided to crochet a snowman for my gift. I have loved the short film The Snowman by Raymond Briggs and try to watch it every year. The spin off The Snowman and The Snowdog is also very cute, and the Father Christmas story is very blooming funny. 

So the morning of the Christmas party (nothing like leaving it to the last minute) I began to design and crochet my Snowman. I am very pleased with how he turned out, especially his floppy hat. He looks quite cheery to me. I am planning to write up the pattern and release it as one of my amigurumi kits for next year.

The Snowman

The Snowman

For my present I received this gorgeous fluffy Santa from my friend Emily. Isn't he fabulous? I love his beard with the curl in the end and his long pointed hat. He is sitting on our windowsill looking very pleased with himself.

The fluffy Santa I received

The fluffy Santa I received

All the gifts showed so much love and creativity. There was a little potion bottle of homemade sloe gin, christmas bunting, a beautiful noel embroidery, luxurious organic hand cream, a pretty felt christmas tree, cross stitch heart ornament, a poinsettia type flower, a granny hexagon stocking and an elegant puff necklace. They are all amazing and I would have loved to receive any of these. Roll on next year, I'm excited already!

All the amazing gifts

All the amazing gifts

Kitchener Stitch tutorial

Grafting ends together to create a seamless fabric is one of my favourite knitting techniques. I use the Kitchener stitch to graft sock toes together all the time, and a few of my patterns use it for seamless seams, such as joining the applied i-cord in Nórui and underarm seams in Maethor. I thought a tutorial on how to do Kitchener stitch might be useful.

Kitchener stitch is used to graft two pieces of stocking stitch together and it creates a seamless join that is invisible from the rest of the stitches. That's why it is so great for sock toes - no seams to rub and cause blisters!

You will need a tapestry needle for this technique.

Set up

To set up for Kitchener stitch there are a couple of preparatory steps that stop the end stitches from being loose.

Step 1:

Arrange the stitches so that there are equal numbers of stitches on both needles and the wrong sides of the fabric are together. This gives you a front needle with stitches and a back needle with stitches. 

Cut the yarn leaving a long tail (at least 3 times the distance to graft plus a 15cm/6in sewing in end) and thread a tapestry needle.

Step 2:

Insert the tapestry needle into the first stitch of the front needle as if to purl. Pull the yarn all the way through (not too tight) and leave that stitch on the needle.

Step 3:

Next, insert the sewing needle into the first stitch on the back needle as if to knit it. Pull the yarn all the way through and leave that stitch on the needle.

The above 3 steps are preparatory and only need to be done once.

Kitchener Stitch

Now we are ready to graft the stitches together. This is the fun part! Do not pull the yarn through too tight on the next steps. It is easier to adjust the tension of the stitches when you have grafted a few together.

Step 1:

Insert the tapestry needle into the first stitch on the front needle as if to knit. Pull the yarn all the way through and then slip this stitch off the front needle.

Step 2:

Insert the tapestry needle into the next stitch on the front needle as if to purl. Pull the yarn all the way but this time leave the stitch on the front needle.

Step 3:

Now insert the tapestry needle into the first stitch on the back needle as if to purl. Pull the yarn all the way through and slip this stitch off the back needle.

Step 4:

Insert the tapestry needle into the next stitch on the back needle as if to knit. Pull the yarn all the way through but leave this stitch on the back needle.

Graft the next stitches together by repeating steps 1 to 4. After a few stitches have been grafted it is worth using the tapestry needle to tighten up the stitches so they are at the same tension as the stitches in the fabric being grafted.

Once you have grafted a few stitches it becomes quite rhythmic. I often remember the steps by counting: front knit off, front purl on, back purl off, back knit on - as in front needle knit the stitch and slip it off the needle, front needle purl the stitch but leave it on the needle etc.

Continue to graft the stitches together by repeating steps 1 to 4 until after step 4 only 1 stitch remains on both the front and back needle, then move to the finishing step.

Finishing steps

The finishing steps are similar to the preparatory steps in that they tighten up the edge stitches.

Step 1:

Insert the tapestry needle into the first stitch on the front needle as if to knit. Pull the yarn all the way through and then slip this stitch off the front needle.

Step 2:

Now insert the tapestry needle into the first stitch on the back needle as if to purl. Pull the yarn all the way through and slip this stitch off the back needle.

Finally, use the tapestry needle to adjust the tension of all the stitches to match the tension of the  stocking stitch fabric, then weave in the yarn end.

There you have it, a grafted stocking stitch fabric with no visible seam. I hope you enjoyed this tutorial. If there are any other techniques you would like help with please leave a comment.